 |
The Internet's Largest and Fastest Growing Engraving Community
Discuss hand engraving using basic to the most advanced methods and equipment
Forum Members: 14,771. Welcome to our newest member, Forensicwx
EngravingForum.com -
Domain since Feb 7, 2003
 Graver Video Conferencing is empty Join now!
|
|||||||
| ENGRAVING TOOLS - Paypal accepted | Classes | Glossary | Feedback | Tips | Sharpening | Bulino | Videos | Forum Policies |
 |
|
|
Thread Tools |
|
#1
|
||||
|
||||
|
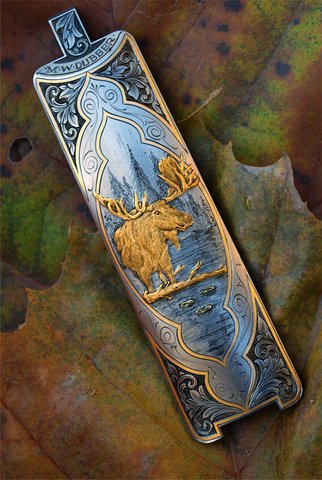
A few weeks ago I posted a thread showing a moose scene engraved in the steel on a rilfe butt plate. The client was very happy and wanted a second moose engraved on another of his rifles - this time on the floor plate and in gold instead of bulino.
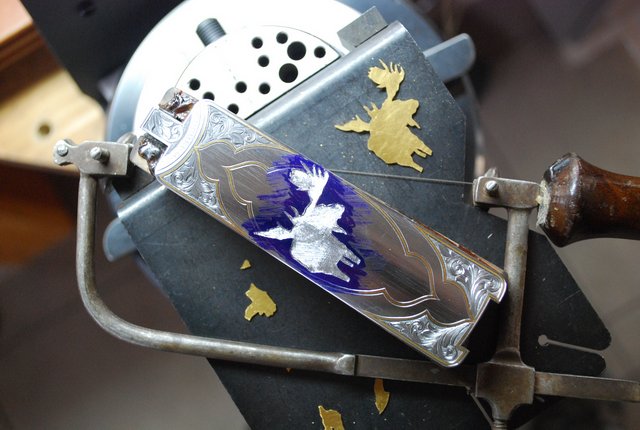
The moose and tree are in 24k yellow and the lily pads are in green gold. The second photo shows the beginning stages of excavation and piercing of the sheet inlay. Mike Dubber  
Last edited by MikeDubber; 11-06-2009 at 04:57 PM. Reason: Photo Changes |
|
#2
|
||||
|
||||
|
Beautiful work Mike
![Thumb[1]](/images/smilies/top smiles/thumb[1].gif) Kevin
__________________
http://leroytwohawks.co.cc/ "Human beings are so interesting; in a universe so full of wonder they have been able to invent boredom." Terry Pratchett |
|
#3
|
||||
|
||||
|
That is a concise and efficient tutorial, nice post.
__________________
Barry Lee Hands www.barryleehands.com "Critics gather, they discuss aesthetics, Artists gather, they discuss turpentine. . ."- Pablo Picasso |
|
#4
|
||||
|
||||
|
This stuff still boggles my mind.... not enough you manage to squish a little thin piece of gold into the steal but once you are finished there is a moose jumping out at you.
I sure admire the skill you and others here have, Peter |
|
#5
|
||||
|
||||
|
Great looking floor plate Mike. I like how you've added different elements to each section. Really nice work!
Please remind us what the blue marker around the recessed area is for. I know you've mentioned it before but I can't recall the specifics. Thanks.
__________________
-James Perkins |
|
#6
|
||||
|
||||
|
Quote:
I remember! Mike said that when he's getting ready to cut an inlay cavity he colors the parts that he won't be cutting down to help make sure he doesn't. Most of the Moose's perimeter is pretty easy to follow but when you get in amongst the points of the antlers it would be really easy to clean out the space between the wrong two lines. But with his method, if it's blue, it stays. |
|
#7
|
||||
|
||||
|
Yes, good observation SVD!
Do you see that little space between the front legs - it's only 1/2mm wide, and so easy to cut out if you loose concentration, the phone rings, or if the lighting/reflections obscure it, or for numerous other silly reasons. By marking the areas with the blue marker those possibilites are eliminated - at least for me! ![Yo[1]](/images/smilies/top smiles/yo[1].gif)
|
|
#8
|
|||
|
|||
|
nice work Mike .. thanks for posting .. ron p
|
|
#9
|
|||
|
|||
|
I'm one of the newer Engraver that get so much out of just the progression pictures, thanks so much for taking the time to share as you work. I know you old timers didn't have this opportunity when you were cutting you teeth in the Engraving World which makes the things you teach all the more valuable to me knowing that it has come from old fashioned hard work and discipline . Thanks again to you and all of the other experienced Engravers in our little World. I hope to do you all Proud in time . .:thank you[1]: Respectfully, Ed Grabow, Shirley Long Island N.Y.
|
 |
| Bookmarks |
|
|