
 |
The Internet's Largest and Fastest Growing Engraving Community
Discuss hand engraving using basic to the most advanced methods and equipment
Forum Members: 14,762. Welcome to our newest member, Katherine
EngravingForum.com -
Domain since Feb 7, 2003
 Graver Video Conferencing is empty Join now!
|
|||||||
| ENGRAVING TOOLS - Paypal accepted | Classes | Glossary | Feedback | Tips | Sharpening | Bulino | Videos | Forum Policies |
 |
|
|
Thread Tools |
|
#1
|
||||
|
||||
|
(If you would like to comment on this submission, you may do so by posting a reply in this thread. Thanks! Kaitlin)
Hi all! Okay, I'll jump on this bandwagon. I hesitate to call this a "tutorial" though... I don't think I've been at this nearly long enough to tutor anyone in anything. Unless you have a question about chickens, then by all means ask away. Seriously though, here's my take on this: This is how I do scrimshaw, from prep to ending. You can sit back and either watch me make something really cool, or totally mess it up! Hey, learning process either way. :D The piece I'm working on, at the moment I'm just calling it the bear scrim. It'll be titled when done, or somewhere in the middle, or whenever I come up with a good title. This all started a while back. In my quest to explore every possible scrimmable surface (it's a long list!) I bought some little slabs of micarta on ebay. I guess there are different kinds of micarta, I haven't a clue what this stuff is, but it's light tan colored, and shows no grain when sanded (darn, I was hoping it would look like fake ivory). So the first step, before I even figured out what do with it, was to sand the micarta, because it's pretty ugly stuff in its raw state. I'm not the world's greatest sander, so this took a while, but after going through the whole series of polishing paper, and then a polishing wheel with some fabulustre (there may be better ways of doing this, don't ever take my advice when it comes to sanding/polishing) I had a nice shiny smooth piece of micarta with pleasantly rounded edges.... |
|
#2
|
||||
|
||||
|
And then of course the real question came up, what should I do? :thinking: It's not a commissioned piece, so that left it pretty open ended. I am making this scrim as a submission to an art show, so I needed to stick with the western or wildlife theme (which is good, since that's my kind of art anyway!).
I kicked around a bunch of ideas, talked to a friend who had some great suggestions (this is actually one of them) and worked up a whole page of "long skinny" sketches that would fit on this 1.5 x 4.75" piece of micarta. I won't show you that because I don't want to divulge all of my future projects!  So I settled on bear cubs. Now, lacking bears here in Wilton (that's probably a good thing) I couldn't very well walk outside and shoot my own reference photos (unlike chickens, on the other hand). So I had to do some old fashioned research and look at oodles of pictures on line, read all sorts of information, find out everything I could about their physiology, habitat, etc. Here's some research and preliminary sketches: 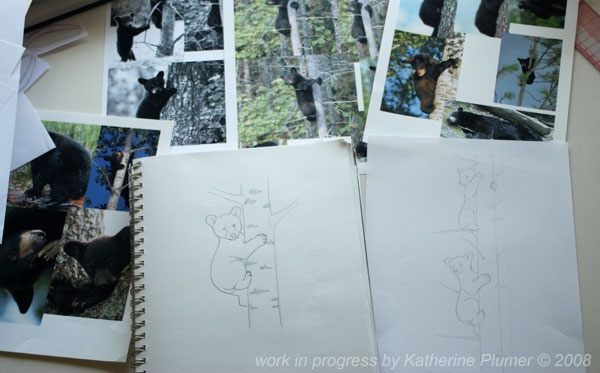 I couldn't quite figure out what technique I wanted to use for this... all stippling (dots) or maybe some lines too? Lines certainly are quicker, but I wasn't sure it would produce the look I was going for. So I did a little practice and made a bear cub pendant, and in the process decided that although this is cute and little incised lines do convey "fuzzy" it was a little wire-haired looking for what I wanted, so for the final piece I'll stick with dots. Good to know! 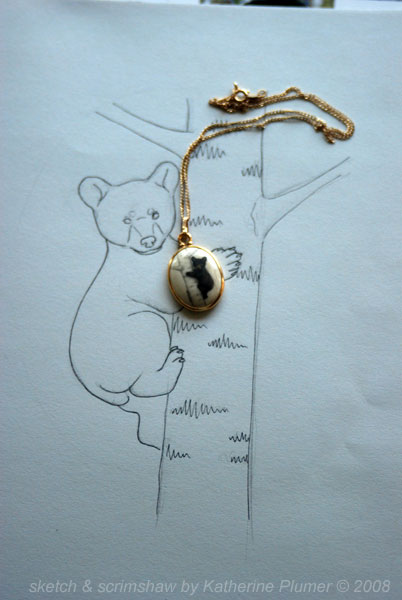 You'll see in the "research" pic above that I have the two cubs on the tree drawn out on an 8.5x11 sheet of paper. I scanned this, shrunk it down to the actual size of the micarta, and went ahead and "colored it in" with graphite, including a rough background.  This is what I will consider my reference piece, as far as how the shading is going to look. The background, though pretty sketchy here, is based on some photos I took way up in northern CA (yes, bear country) but having spent a bunch of time last month in Idaho/Wyoming/Montana (OMG loved it!!!) I am going to change the mountains a little bit to more resemble that part of the country. And I did see bears while I was there! Saw a bear and two cubs while trail riding in Grand Teton National Park. Cool! My photos came out terrible though, so good thing I wasn't counting on that! |
|
#3
|
||||
|
||||
|
Oops, I should have talked more about the art itself in the previous post, but I'll do that now instead. In my opinion, the artwork and the composition are just as important as the technique. You can't save bad art with fine technique. It's kind of like the old saying "you can't polish a turd." I have seen some incredible pieces (not just engravings, but paintings and sculptures and everything) that are "technically" flawless, but flawed in composition or the anatomy of the critter being portrayed. Like anything else, whether it's horse training, relationships, or building a great chicken coop (you know I have to get a chicken reference in here) you have to have a good foundation. If you feel you can't draw, perhaps it's time to learn. :yesnod:
The next step is getting the image onto the item that's going to be scrimmed. There are a number of ways to accomplish this, and I have used various techniques for different pieces, but since this is flat and not a weird shape, this is really simple. I had already scanned the full-sheet image and shrunk that down to the size of the micarta. 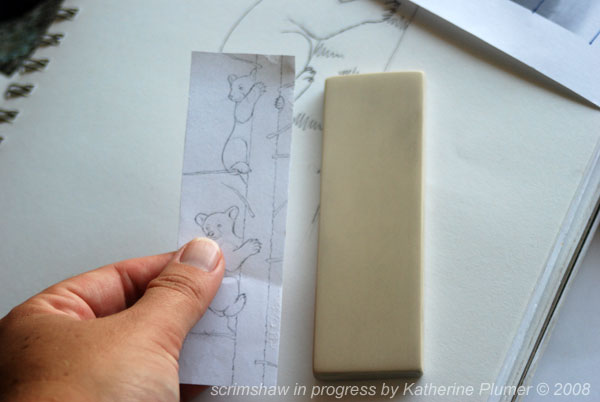 So I cut out one of those printouts (just the outline drawing, not the shaded one), taped it to the micarta, and using my steel etching needle I poked holes around the outside of the bears and the tree (through the paper). I did NOT incise any background at this point. That would just make the image too confusing at this point, and since the background doesn't need to be super precise, I can just hand-draw that on later. Ha ha, nothing like trying to do a left-handed photograph of myself, egads! 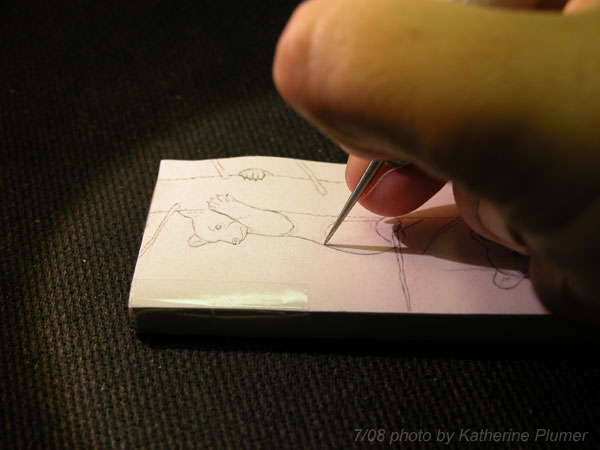 Periodically while doing this I'll lift the paper up and smudge a little ink on the micarta just to make sure I'm poking the holes deep enough. It takes a little practice. There's nothing like thinking you're done only to find that nothing came through. Or to have a really heavy-handed outline on a very fine piece. See the holes through the paper? 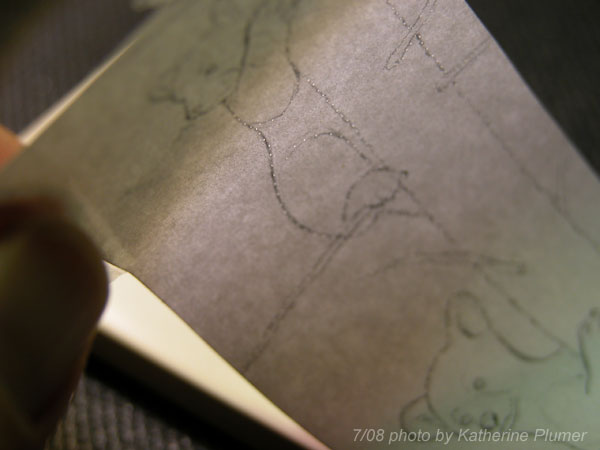 So this is where it's at right now. The outline is there, barely visible but just enough to work with. 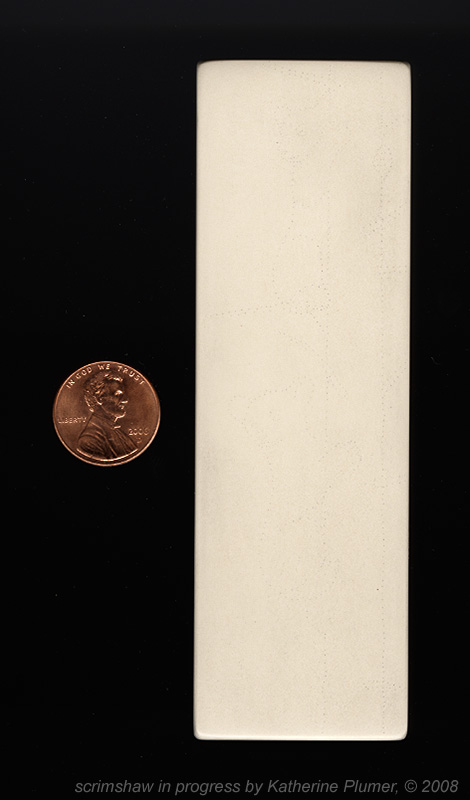 Here's a closeup: 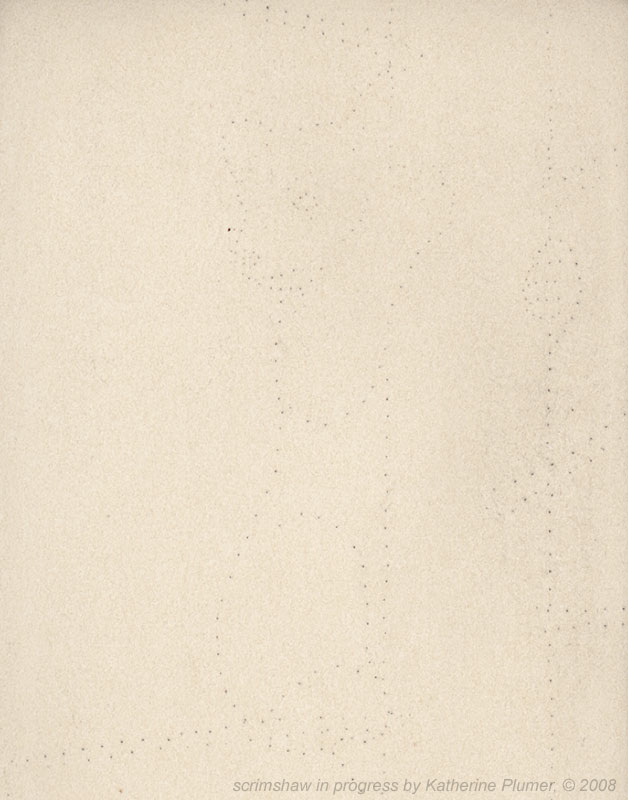 I've never worked with micarta before, so this should be an adventure. I can already say it's hard to wipe clean, so we'll see how irked I'm feeling by the end of this. Or maybe I'll love it! My original plan had been to do this piece in color. I changed my mind after deciding that attempting a blue sky and clouds on this very tan colored stuff would be a mistake and end up looking muddy. And, truth is, I really prefer the b/w anyway! I will talk about tools and stuff in an upcoming post, and keep an eye out for the work-in-progress pics! |
|
#4
|
||||
|
||||
|
Okay, let's talk tools! It's blissfully simple in my world. I figured after poking holes in things for a year now I would have amassed a collection of scrimshaw tools, but nope, I still am just using two of them. It's kind of refreshing, since over at the other drafting table there are about 300 colored pencils to pick from!
I don't have any air powered tools. That's not for lack of wanting one.  When I have to put in a large area of solid dark scrimshaw, omg do I want one. Doing all that one dot at a time, well, it's tedious to put it mildly. But for now, I'll take tedious. When I have to put in a large area of solid dark scrimshaw, omg do I want one. Doing all that one dot at a time, well, it's tedious to put it mildly. But for now, I'll take tedious.I started with this one, a double ended pin vise. It came with a steel needle and a carbide tipped needle. I quickly decided I preferred the carbide tip for some reason, but holding this skinny little pin vise in the right position didn't agree with my hand: 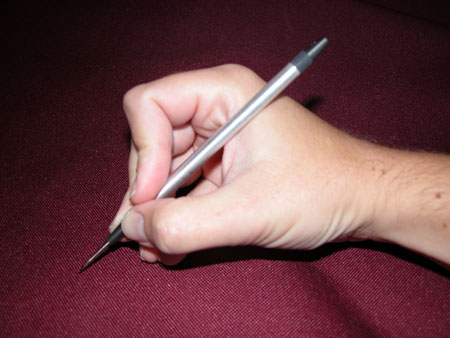 So I beefed it up a bit with some leather, and I keep the steel needle in there full time: 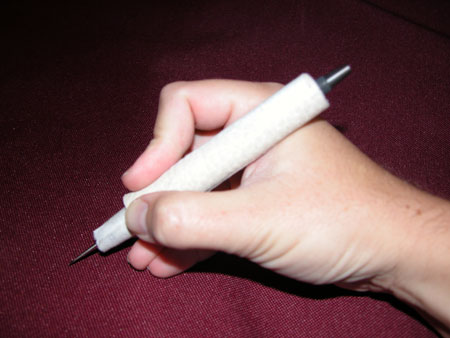 This helps, and if I'm making lines this is the tool I use. I also use this when doing the image transfer through paper (see previous post). For some reason the steel needle just seems to accomplish that better. But I still wasn't thrilled with trying to use that for stippling, so with a hacksaw and some aluminum tape I cobbled up this little thing: 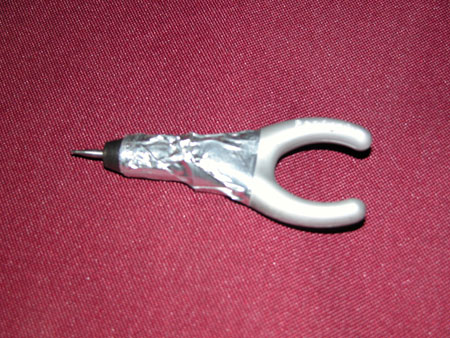  Won't win a beauty contest but I really like it and it's comfy to hold. It's part pen, part pin vise, and part carbide tipped etching needle. I use this one for stippling, though sometimes just for kicks I'm known to switch back and forth a bit. Both tools have a very very fine point. Why not have something more coarse? Just my style of working, I guess. I get pretty aggressive when making dark areas, but otherwise like to have the dots very fine. Here's my view sitting at the table (oh, just in case anyone's curious this is all set up at a drafting table, I don't have an engraving bench persay.) 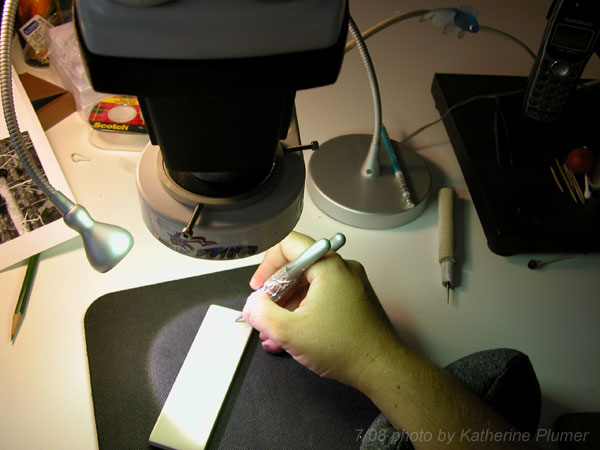 I hold the tool just as I would hold a pencil, and as long as I pay attention to what I'm doing it's upright enough that I get round dots and not sideways dots. I really don't like it when I end up dots that have "tails"! Last edited by KatherinePlumer; 07-24-2008 at 01:34 AM. Reason: adding a photo |
|
#5
|
||||
|
||||
|
The first step for me when starting an image that I've transferred to the scrimmable surface is to "connect the dots" and make a real outline around the subjects so I can see what I'm doing. I've kept the bears deliberately lightly outlined right now since I don't want a real harsh line there (since they'll be fuzzy). The tree gets a more substantial outline. Oh, and I should clarify I'm not actually making any lines at all, this is all dots.
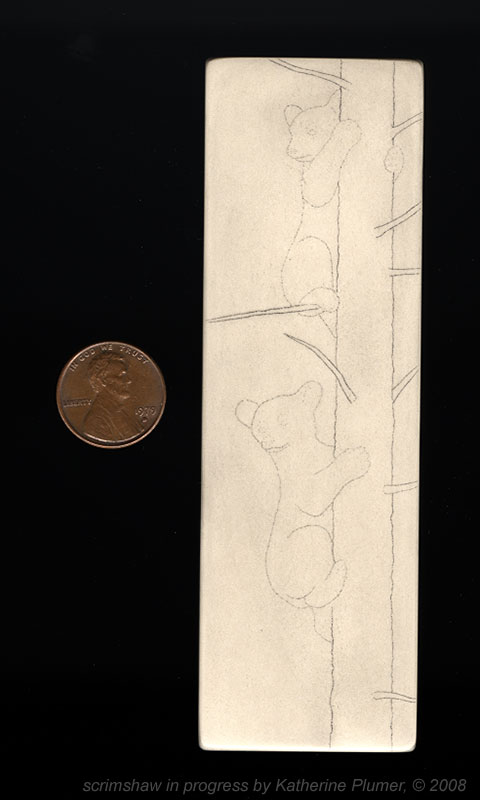 My plan of attack on this piece is to start with the foreground and work my way back. I won't even get the background drawn on there for a while yet. There might be other times I would do this backwards, or skip around from area to another, but I would hate to accidentally put the background in too dark (you can always make something darker, can't go the other way!) and since the values of the background will play off the values of the foreground, I'm going to put the foreground in first. Probably I will get the tree mostly done, then scrim the bears, then touch up some shadows on the tree. I do the same thing in my drawings and paintings, sometimes I work front to back and sometimes back to front, it just depends on the subject matter and how things overlap. I always got in trouble in art classes for working this way. My teachers would say "you have to work on all areas of your paper/canvas/etching plate/whatever at once, don't finish one part and then start another!" Eh, I just don't function that way, though I will say I don't necessarily finish one part at a time, I just get it really close so I can see the rest of it should play off, and then I'll work back into it and do more shadow and stuff. If you have a style of working that works for you, don't let someone else tell you that it's wrong. Stick to your guns (or knives, or ivory, or whatever the case may be). 
|
|
#6
|
||||
|
||||
|
Alrighty, so as I said I'd work front to back on this, so the first thing I did was scrim and ink the branches. They're not necessarily finished, but they're at least pretty darn close:
 And then I set out to scrim the "base coat" of the tree trunk. I'll be working back into it extensively to get the right amount of shadow and the texture of the bark, but all I wanted at this point was to get the basic form down so it has some roundness and isn't white. Normally I scrim a tiny bit, ink it, scrim, ink, repeat endlessly, but for the sake of being able to throw an inking demo in here I did the whole trunk (well, except that little bit at the top) all at once. The trunk is fully scrimmed/dotted/incised/whatever you want to call it here, but of course you can't see that until I ink it (unless you get the light at just the right angle):  I use etching ink. Some people use oil paint, some use India ink. I don't really think there's any right or wrong ink, I just figure etching ink is designed to stick in etched lines, and I like working with it, having done a fair amount of printmaking. I always inked metal plates by "squeegeeing" ink across them with a bit of scrap matboard, but since I don't want to accidentally scratch my scrimshaw I just use my finger. It hasn't killed me yet: 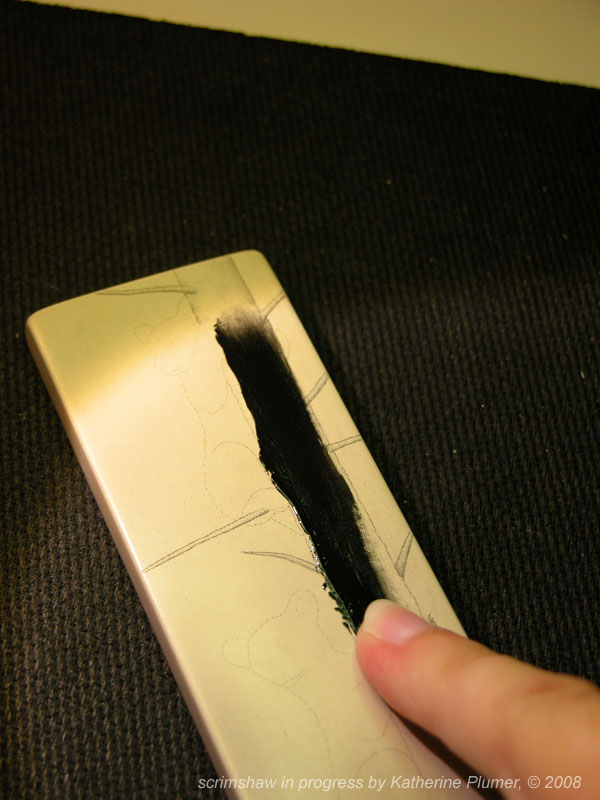 It does give one a chronic case of "inky pinky" though. You can always tell by my hand whether or not I've done scrim on any given day, and I have to be exceedingly careful to clean that up, since I'm often bouncing back and forth between scrim and drawing (colored pencil and graphite) and don't want to accidentally ink my drawings!): 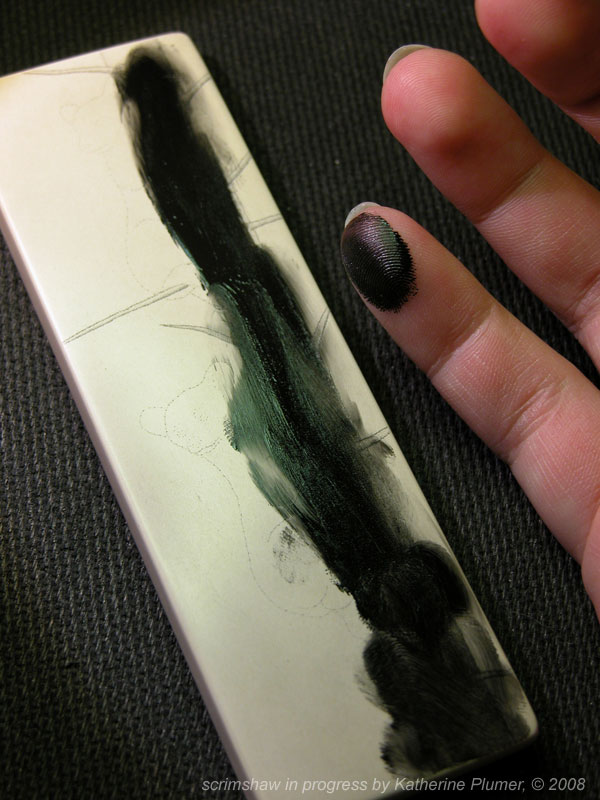 Next step, wipe the excess ink away. In ivory I usually just use kleenex but this micarta is a little reluctant to part with excess ink so I'm using my lovely paint rag as some added elbow grease: 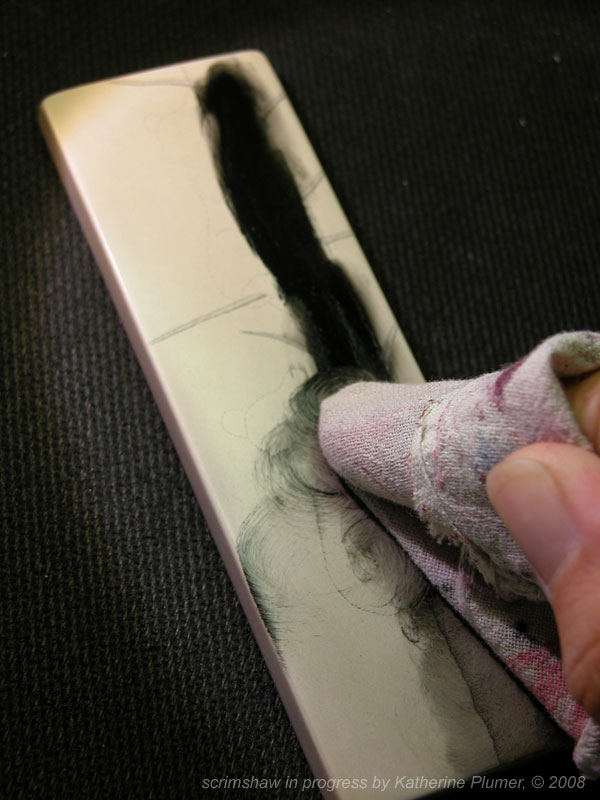 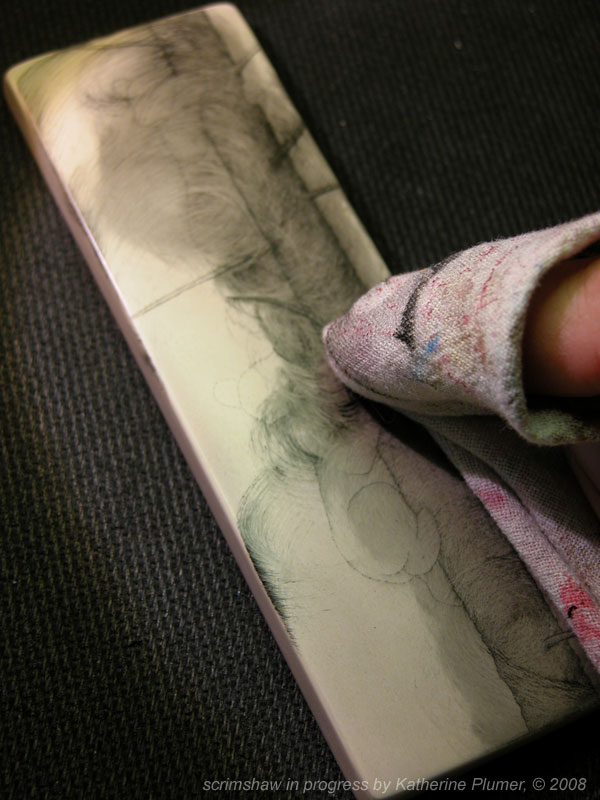 And then here's how it looks right now: 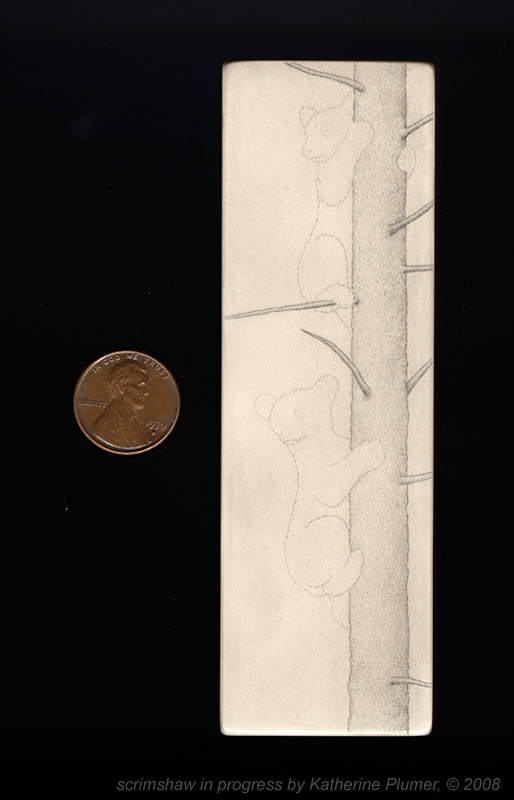 So the next step is I will be putting the detail on the tree (bark, more shadow). |
|
#7
|
||||
|
||||
|
The question comes up sometimes "Is scrimshaw the same as bulino?" I have never done bulino engraving, but the answer is no, at least not the way I do scrim (I'm hesitant to say that's universal, because I really don't know). I am not removing any of the ivory/micarta/whatever. There are no little chips to be popped out, I'm merely poking holes and/or scratching lines.
Generally it takes very little pressure, unless you're working on solid black areas, which can be maddenly difficult because no matter how many holes you make there is always going to be some high ground that won't hold ink. If you've ever done a stipple drawing with an ink pen, it's a lot like that. If you haven't done that, you should, it's a good test to find out whether or not scrimshaw will cause you to go insane. :willy_nilly: So what I've been working on over the last couple days (mostly today, it was a busy weekend with other distractions such as a horse show) was to create the texture of bark on the tree trunk. I'll say right now the tree is definitely NOT finished. I will be working back into it to add more shadow, but I want to scrim the bears before I do that. So the next step is going to be the bears, then more work on the tree, and then the background. 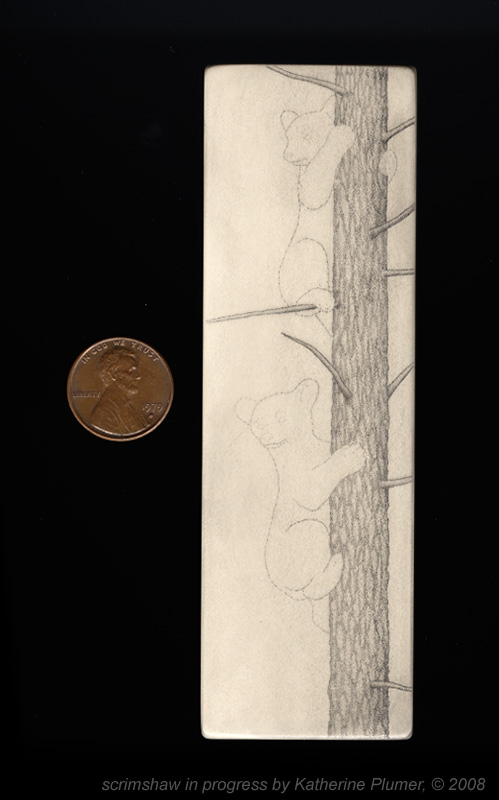 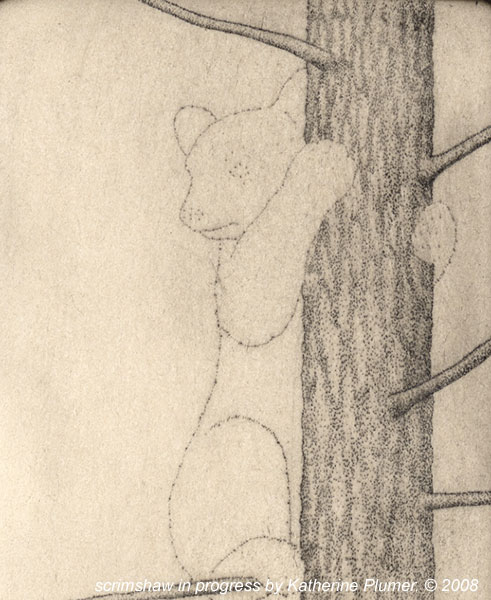 If you have any questions please don't hesitate to ask! ![Smile[2]](/images/smilies/top smiles/smile[2].gif) I'll post work-in-progress pics and explain what I'm doing but if there something specific you want me to ramble on about, I'll happily oblige. :talk: I'll post work-in-progress pics and explain what I'm doing but if there something specific you want me to ramble on about, I'll happily oblige. :talk:
|
|
#8
|
||||
|
||||
|
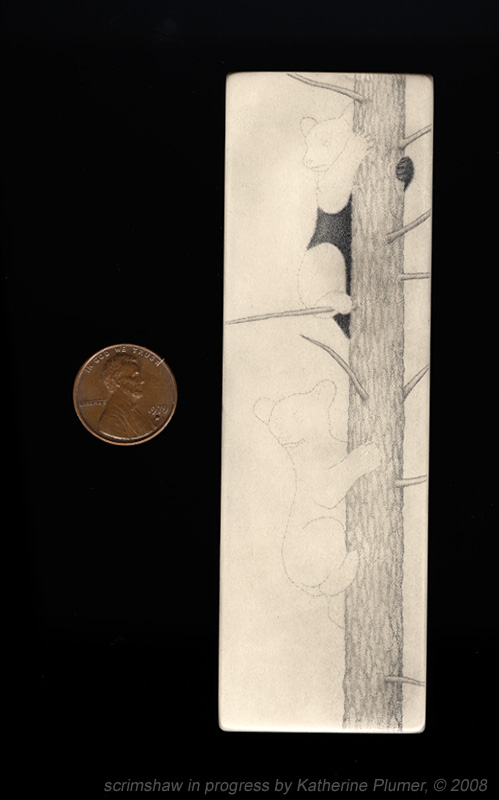
Just a work in progress pic for the moment, my brain has gone to bed even if the rest of me hasn't yet... Did I mention that dark areas are tedious?
|
|
#9
|
||||
|
||||
|
I was out of town this weekend, so I didn't get very much done:
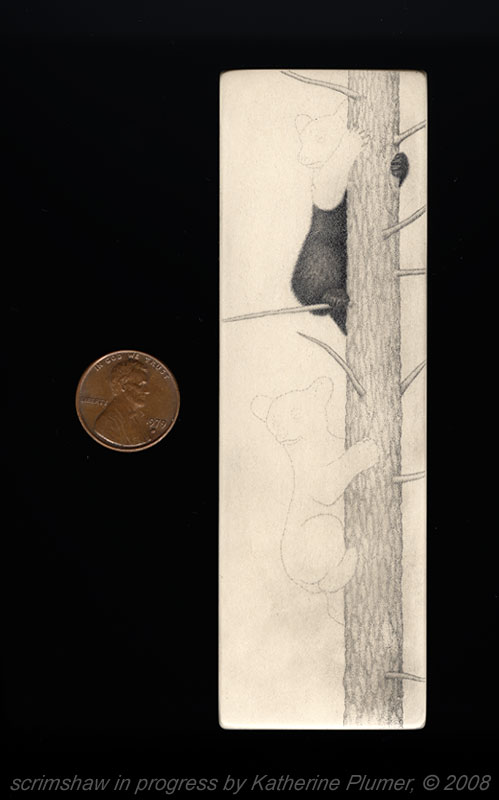 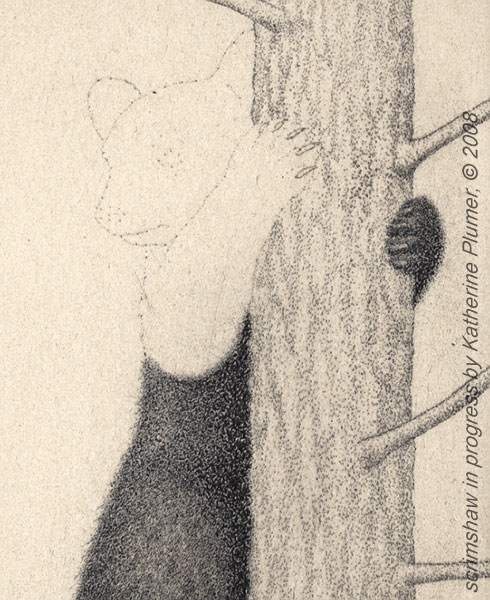
|
|
#10
|
||||
|
||||
|
So I'm thinking "polar bear in snow" would be a good subject for my next project.
 Just kidding, but egads these black bears take a lot of dots! Actually the next project is probably a team of draft horses (dark colored horses, why do I inflict this on myself!) Just kidding, but egads these black bears take a lot of dots! Actually the next project is probably a team of draft horses (dark colored horses, why do I inflict this on myself!)Lest anyone think I get the appropriate level of darkness on the first go-round, I don't. Ever. And that's probably good, because it would be really unfortunate to make it too dark too fast, you can't erase this! I work on one little area at a time, building it up darker and darker til it gets where I want it to be. Maybe I ought to show that. Should I show that? That'll be like a mini-tutorial! Work in progress pics: 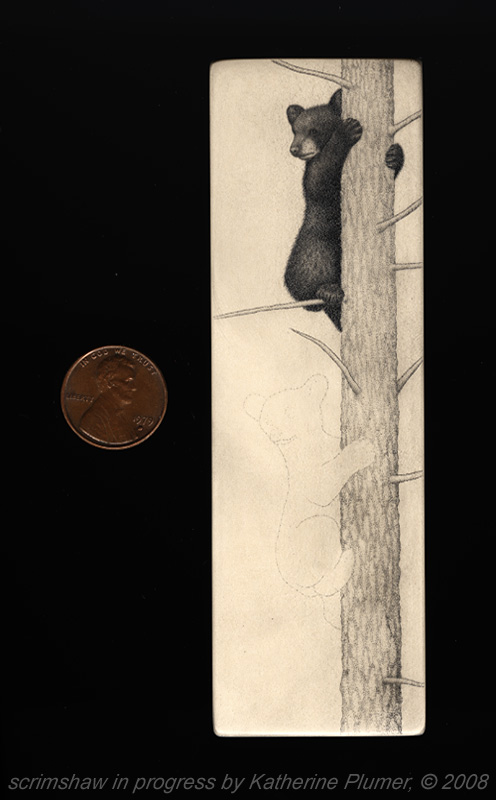 
|
|
#11
|
||||
|
||||
|
I'm still here, haven't fallen off the earth. Whew. With a big art show and a big deadline looming next month I am attempting to multitask a whole bunch of art projects at once (this scrim, three drawings and soon adding two more, sketched out nude scrim #4 this afternoon). Can I shamelessly plug my blog and say if you click on the link to the website at the bottom of this post you can see all the other stuff I'm doing...
 So, today's little progress: 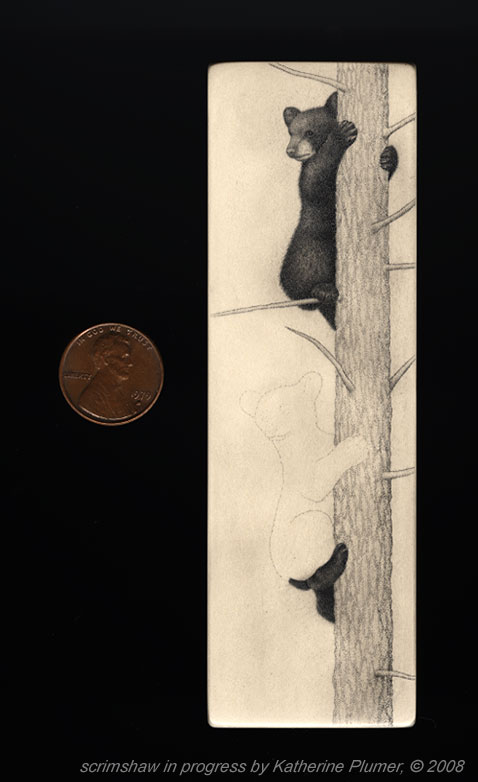 I will show you the process of building up the scrim until it gets dark enough but I wanted to wait til there was a biggish area to do that, so I'll endeavor to show that tomorrow on the bear cub's haunches. |
|
#12
|
||||
|
||||
|
Alrighty, today we have a tutorial within a tutorial. I said I'd explain a little more about the inking and building up of dark tones. This seems strange for me to be posting up my work in progress in *this* much detail. I've been putting work in progress pics out for the world to see for years but now I feel like I'm letting you in on my secrets.
 Don't everyone go out and start doing scrimshaw okay? Leave some for me, ha ha. Don't everyone go out and start doing scrimshaw okay? Leave some for me, ha ha.  Size is so relative isn't it. I spend gobs of time today working on this little area that's, oh, about the size of my fingernail, and it seems HUGE. And then I switch projects and work on a 12x18 inch horse drawing and think "hmm, this is kind of small." Anyway... Okay, so here I've scrimmed (incised, dotted, stippled, whatever you want to call it) the bear's haunches, but have not yet inked it. It's much easier to see under the scope, this is just scanned. Not to mention this micarta has this flecky/grainy coloration, so trying to actually see what I'm doing on it is, um, challenging... 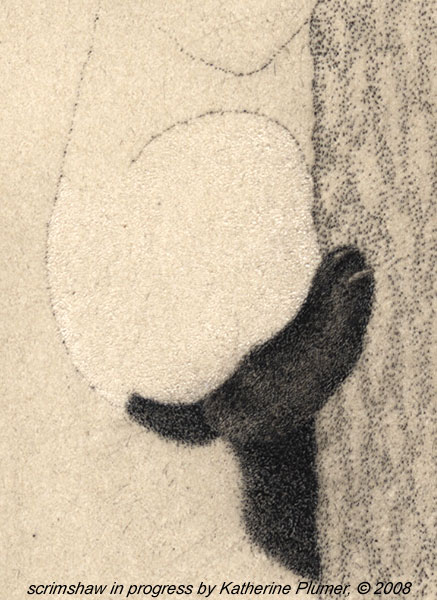 My aim was not to make this dark enough, just to get a somewhat uniformish dark tone on there. So I inked and... eww, ugly, blech! Don't worry, that's how it goes. Now if I was doing a light area, or something detailed, or with more gradation, I'd obviously be more careful, but since this is going to be so dark, it's all good, and this is exactly how I figured it would look. 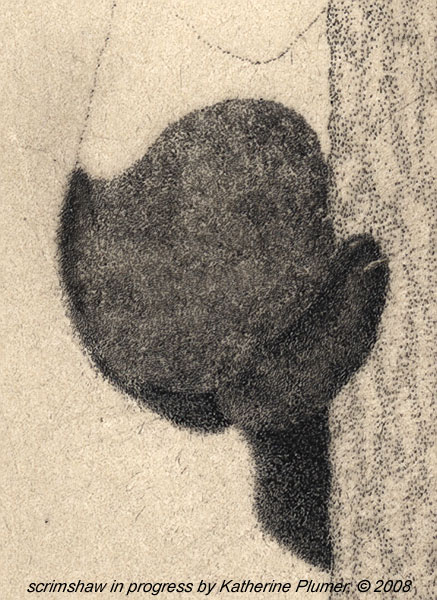 Okay, so then I work into it more and try to even out the tone a little (just adding more dots!), and have more of a gradation toward black in the shadow areas. Ink it again, and... that's a lot better! 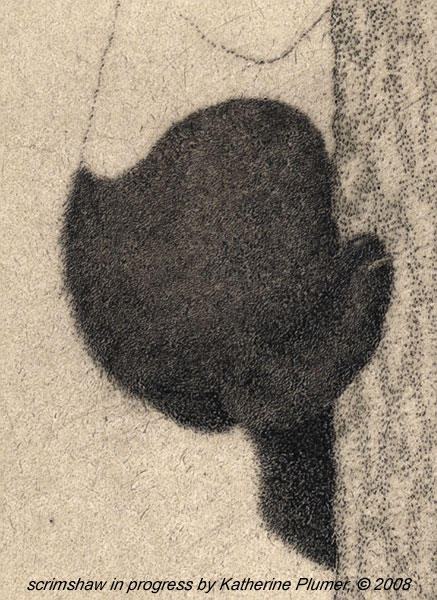 But now what I need to do is REALLY push the shadows all the way to black, and put a little fur texture in there too. Dot dot (repeat endlessly), ink it, and... yay! Got it. The area along the bear's belly and side will end up being darker, I'll be blending into that as I go. And since I know someone will ask, yes I did manage to somehow get some scratches on there [casts accusing look at fingernail]. That won't be a problem considering the location (DARK), but I need to be careful. 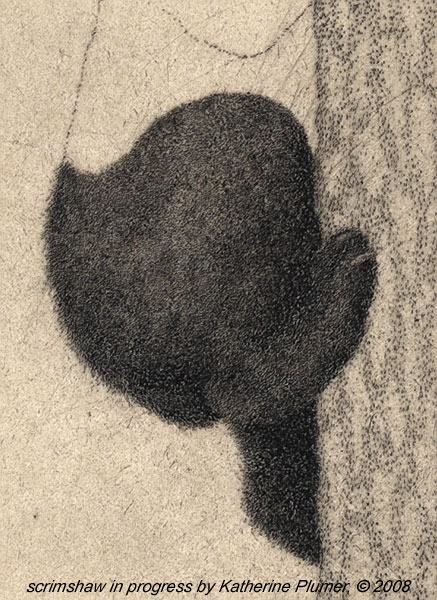 So this is how it looks at the end of today: 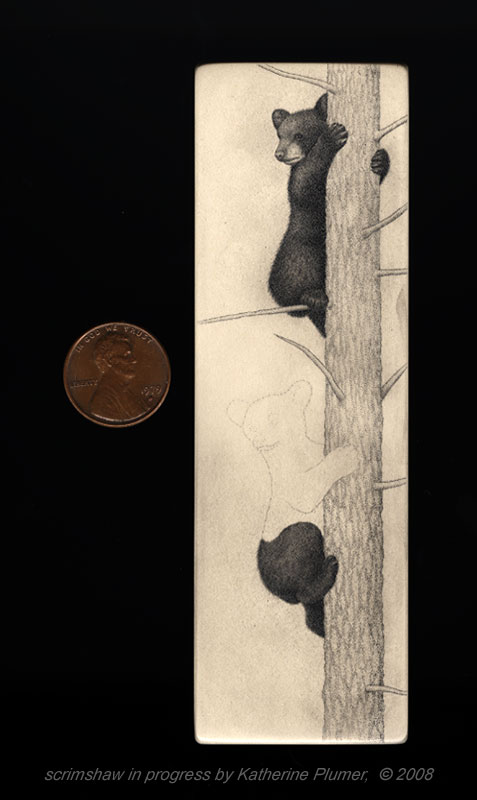
|
|
#13
|
||||
|
||||
|
Well you know what they say, slow and steady wins the race.
 I need to start thinking about the background, that's coming up pretty quickly. If you have questions, bring em on! Or just kick back and watch the work in progress pics. ![Smile[2]](/images/smilies/top smiles/smile[2].gif) 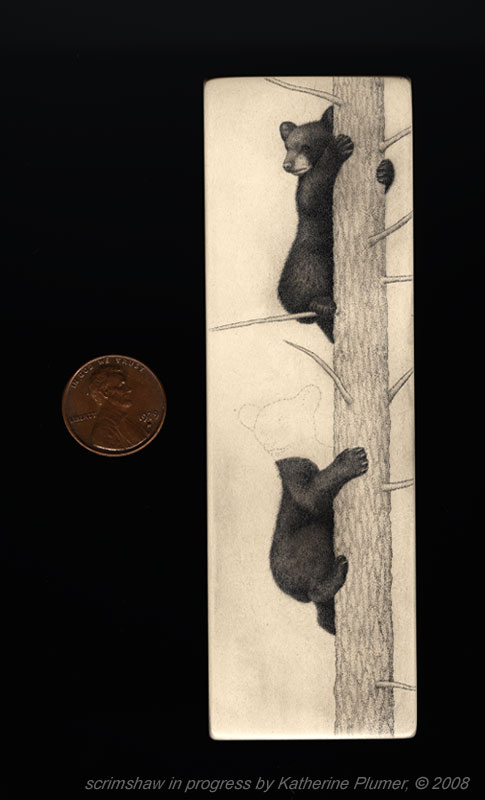
|
|
#14
|
||||
|
||||
|
Alrighty, continuing onward with the work in progress pics...
Finished the bears (other than I may tweak a few things here and there, but for the most part they're done): 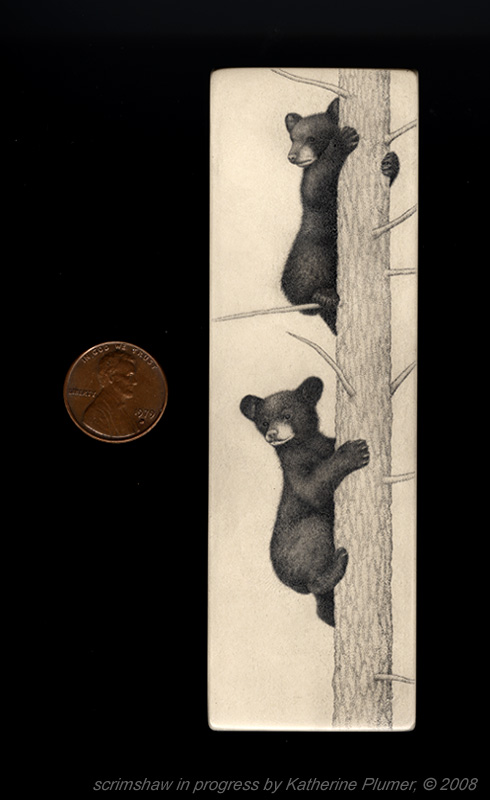 And then I adjusted the shadows a little bit on the tree: 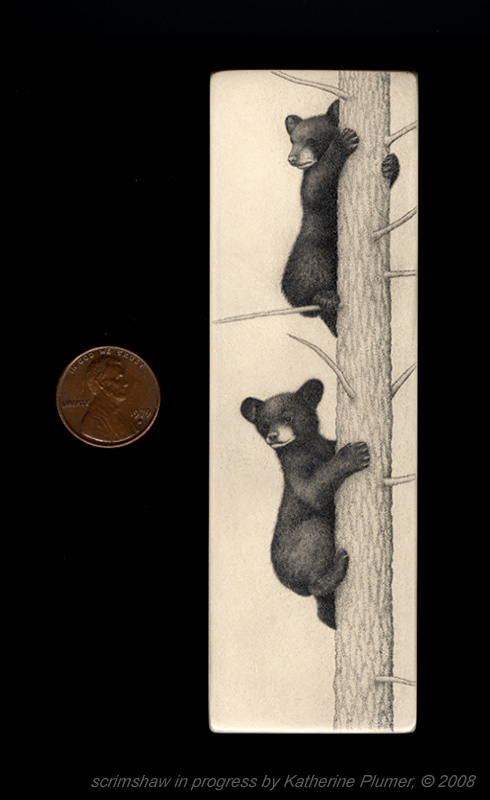 Next up, background! I have to go back to the research stage a little bit for this. This is where it pays to take a lot of photos. :camera: Stay tuned.... some day I really will finish! |
|
#15
|
||||
|
||||
|
Today's progress:
After some deliberation I decided to add a border. There are two reasons for this, the second of which is the more important one. For one thing, as an element of design, I kinda like it, and I've put some sort of border/outline on all my scrims so far (hmm, I think...not the elk tooth though). But the more important reason was that I didn't want my image to look bad if I took it all the way to the edge. I rounded the edges on this micarta, so working all the way to the edge without skittering off is difficult. So, border it is! 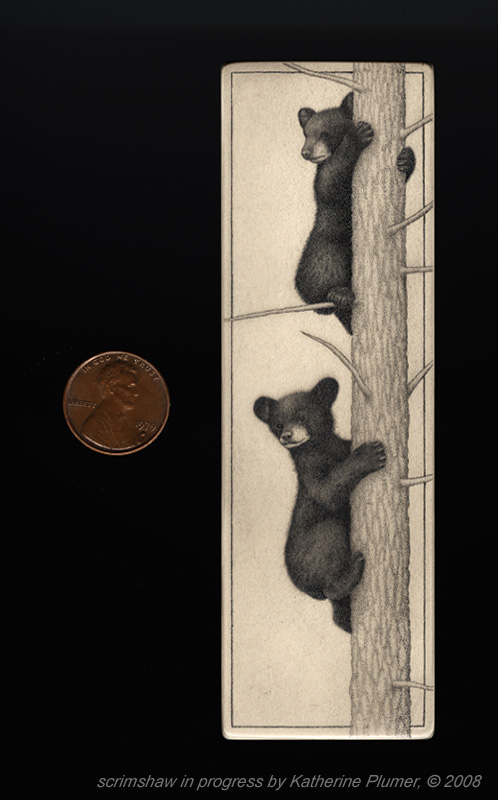 Hmmm, background. I looked at a lot of pics I'd taken, decided I wanted the original river scene to be more of a lake (well okay it could be a very wide river, no matter). I just wanted to move the original tree-line upward so as not to interfere with the bears. I hope the viewpoint comes out properly on this. I imagine this tree the bears are in is atop a hill overlooking a valley with a lake (river?) and trees, and mountains in the background. Our viewpoint is somewhat high, we're level with the bears looking down across the valley. They may not be very high up but we don't see the base of the tree (though there will be some hillside and grass showing). This is drawn on with soft graphite, I then dotted over it with the etching needle.  Sky with a happy cloud (bonus points if you know who I'm quoting! :painting: The friendly trees will come later...): 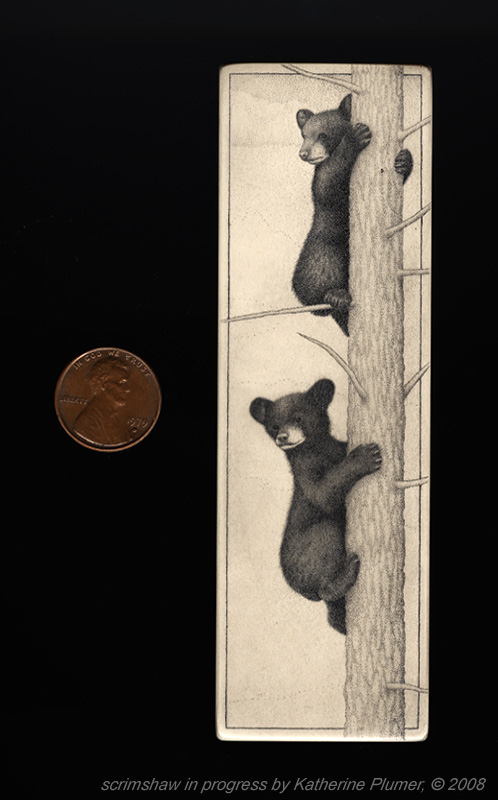 Added the lake. This may go darker or have more detail as it progresses, I'm not really sure yet. I don't have one photo that has all this stuff in it so I'm kinda winging it as I go. 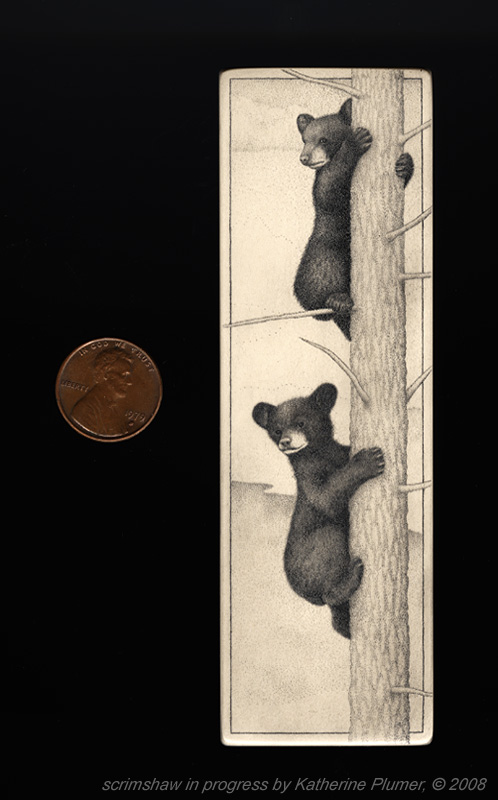
|
|
#16
|
||||
|
||||
|
Hey, somebody's slackin' on moving my posts to the other thread, ha ha.
 Today we have mountains! And I darkened the sky a little. I'll try to do another little mini-tutorial when I scrim and ink the background trees, that'll be an interesting section to build up (in other words I'm flying by the seat of my pants, I'll figure it out when I get there!). 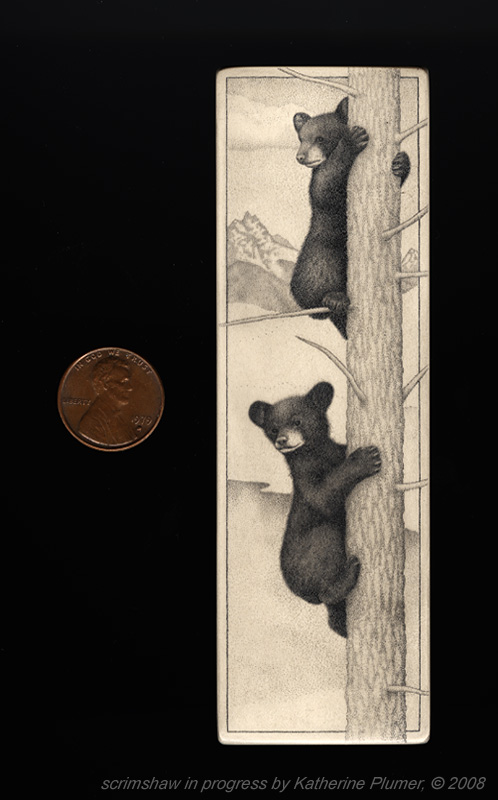
|
|
#17
|
||||
|
||||
|
This just keeps getting more exciting as I get closer to being done. I really like this piece!!! :D I'm going to miss posting works in progress here when the contest is over though...
I'll do the in-extreme-detail work in progress thing with the next section of trees (that blank mid section will be pine trees). 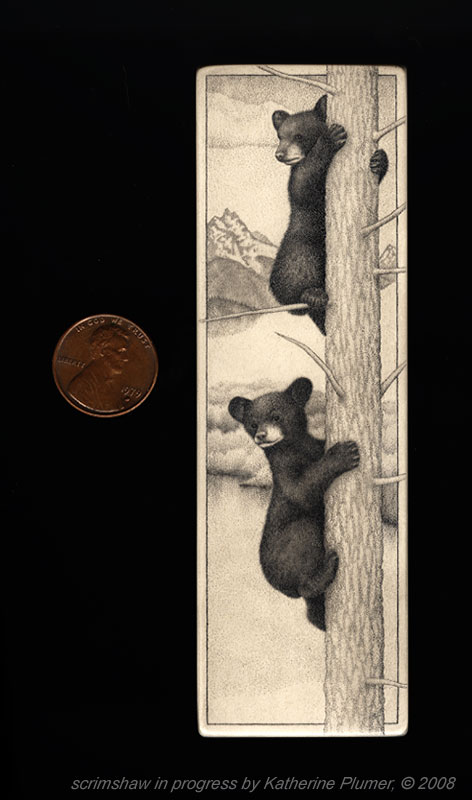
|
|
#18
|
||||
|
||||
|
It's getting so close to done!!! :whoo:
I was going to keep working on the middle section (the blank spot that will be pine trees) tonight but decided I'd better do a "work in progress" pic before I did any more, so I guess I'll just do that part in one fell swoop, tomorrow. Today I worked on the foreground. All that's left is the middle section of trees, and then I'll make sure everything is properly inked, and I *might* work back into it to pick out some light highlights. I'm not sure yet about that, and that has to be the absolute last thing after all the inking is done. I didn't want the foreground hillside to be distracting, just wanted an indication of ground. I'd thought about doing flowers and all that but decided that was too finicky and I would be better off keeping it really simple and keeping the focus on the bears. I started by just putting in a light gray tone: 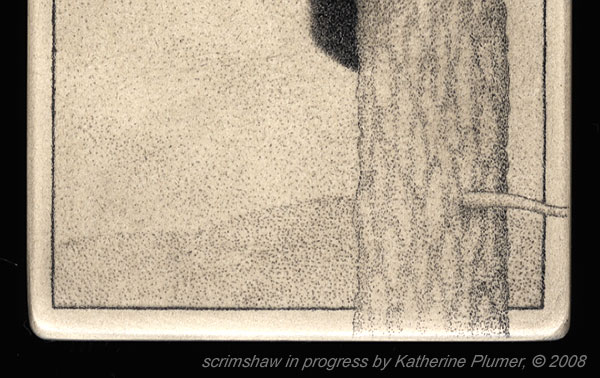 And then some lines (well, they're dotted lines) to indicate stalks of grass: 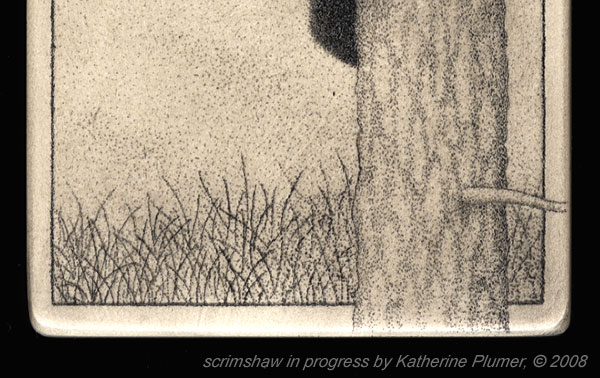 And then more gray tone and a bit of gradation to make it more solid. This an area where I may pick out some highlights. We'll see! 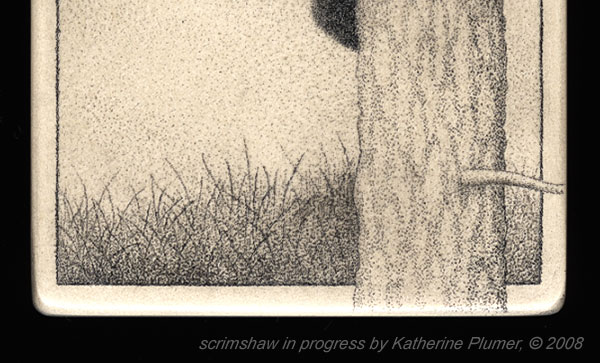 So here's where it's at today: 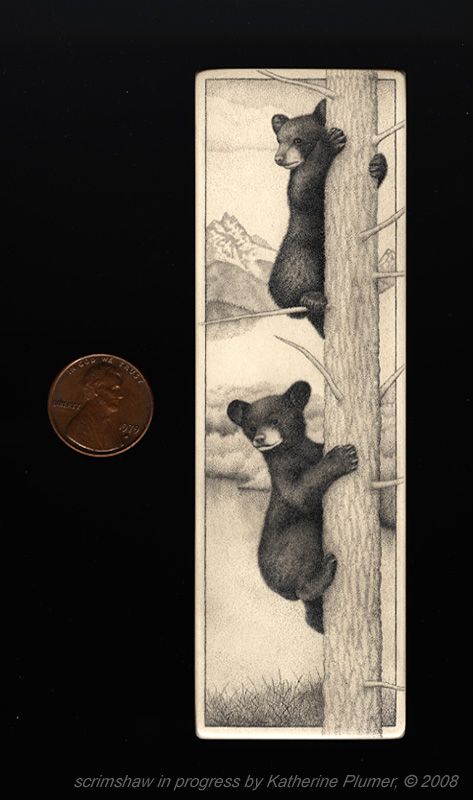 Should be just a day or two more, and then it'll be about two weeks til it's framed (I'll post a pic of that when it's all done). |
|
#19
|
||||
|
||||
|
Today I scrimmed the last section, the pine trees. I'm only going to show you close up pics today. It's sooo close to being done, I just want to darken the shadows on the bears a tiny bit, maybe do a few highlights, and then it'll be done, so you'll just have to wait to see the whole picture. What a tease.
 I should have done a closeup scan of the blank area, but I didn't think of that til after the fact. Oops! So here it is with a "base coat" of dots, giving a pale gray tone. Eh, too pale: 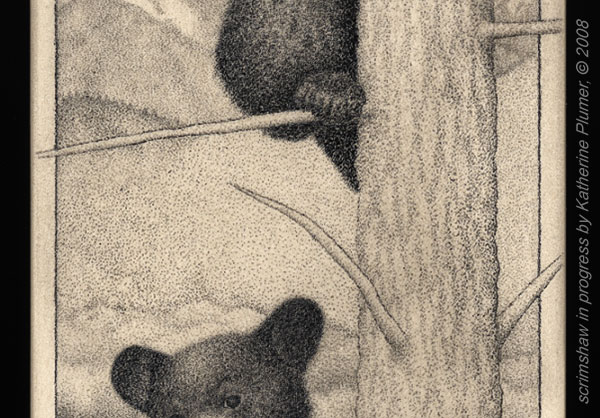 Added more dots, yup that's better: 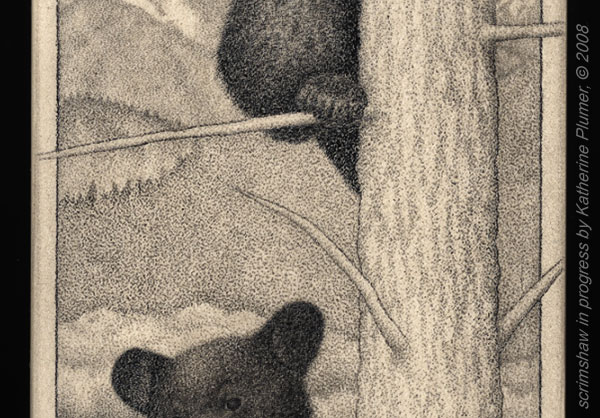 The trees roughed in with soft graphite. Yes, I know that's not pretty. [EDIT] I was PM'd a question about this so I think I need to explain it better. I was asked why I appear to have my lines crossing over the foreground tree branches, but then later these lines are gone. Okay, what you see the pic directly below this paragraph are lines drawn with soft graphite, just roughing out where the foremost pine trees will be and how tall they will be. Soft graphite won't scratch the surface, so I just kind drew it willy nilly on there, no problem that it overlaps the foreground branches. When I then work into it with the scrim tool, I do NOT scrim over any of the foreground material, I'm quite careful about that. The graphite wipes right off, so when I ink it any traces of graphite lines will disappear. Does that make sense? I hope that makes sense. 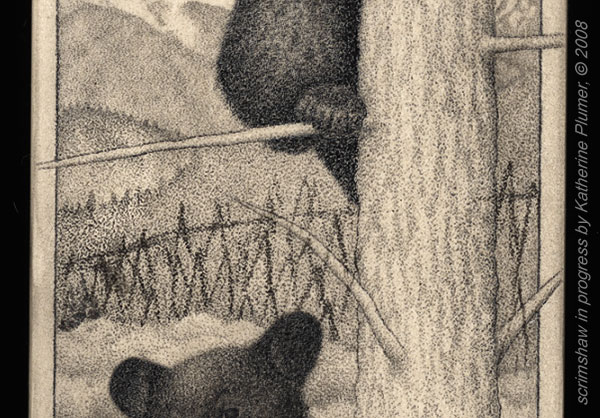 First pass at getting the foremost trees scrimmed in dark. Deliberately not all the way fleshed out or dark enough yet:  Added more dots, I wanted it darker, softer focus, and blending a little more with the willowy/bushy trees closer to the lake: 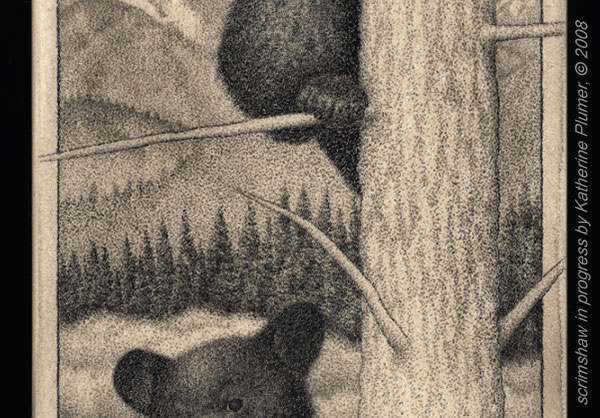 As the trees recede into the distance, I'm pretty much just making darker "diamond" shapes, smaller as they get farther back. At 10X magnification they look pretty ugly, but back off from it and voila, trees! I also have darkened the shadow on the foreground tree. 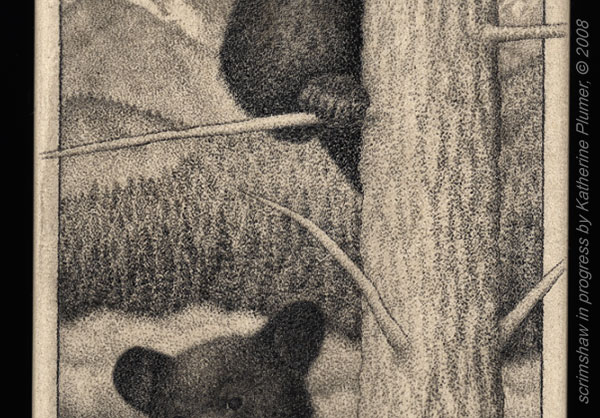 Stay tuned! ![Smile[2]](/images/smilies/top smiles/smile[2].gif)
|
|
#20
|
||||
|
||||
|
Well, ha ha, I had mistakenly thought I had "just a little" more work to do. Good thing I did not attempt to stay up and finish or I would have still been up in the morning. You know how these things go, I'm sure. I darkened the bears, inked it, tidied it up, scanned it really nice, emailed it off to the friend who had the idea for it in the first place, sat back and looked at it.... and just wasn't sure. And then my friend emailed back with some suggestions, one of which was exactly what was bothering me about it anyway. Sometimes you really need a fresh set of eyes to look at things, or at least I know I do. I stare at my stuff all day and can easily overlook what's obvious to others.
Here's when I thought I was finished. I was going to just skip to the very final last image but I think it's important to explain why I made some changes, so here's how it looked around lunchtime today: 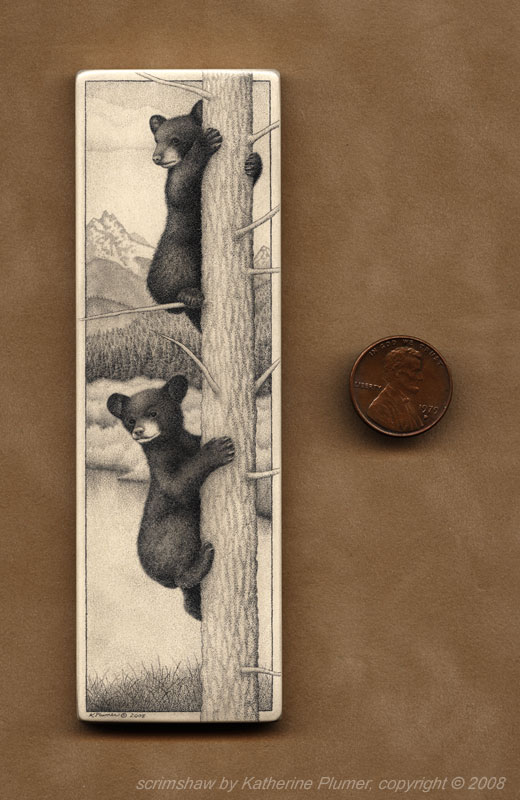 And then I picked up my scrim tool again, and with a few breaks here and there, called it done many hours later. What I did: 1) that cloud, it was just so bland. So I darkened the sky again and kinda fiddled with the outline of the cloud a bit. 2) the willowy trees by the lake were too pale. The surface of the water should be more pale than the trees, so I added a fair amount of gray tone to the trees. I worried incessantly the whole time I was doing all this, rather terrified I was going to make it too dark.... I also darkened the pine trees a smidge and tweaked a few things on the bears. But when I inked it and wiped it clean, OMG how that foreground tree pops out! Woo! Love it! So NOW I am done. :whoo: :whoo: :whoo: And just because I've always wanted to use this smilie:  I'm taking it to the frame shop tomorrow morning. In two weeks it'll have a frame on it. I'll post a pic of that when it's done just for kicks, but that may be beyond the scope of the tutorial thingy. So for now, here it is (not yet titled, I'm still thinking, I'll post a pic in the main forum when I get that figured out...soon): I'm taking it to the frame shop tomorrow morning. In two weeks it'll have a frame on it. I'll post a pic of that when it's done just for kicks, but that may be beyond the scope of the tutorial thingy. So for now, here it is (not yet titled, I'm still thinking, I'll post a pic in the main forum when I get that figured out...soon):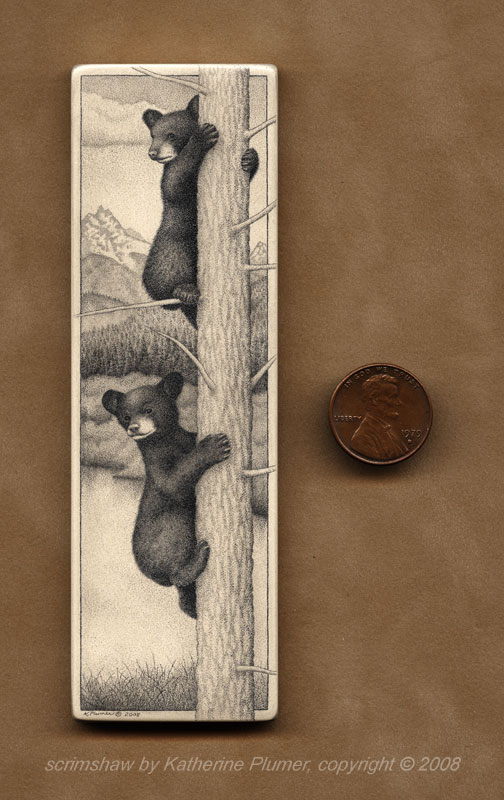 In conclusion, well it's been fun! As I said I'm going to miss posting work in progress on the forum, so head on over to the blog to see more. This piece marks one year that I have been doing scrim. I'm really really happy with how it came out. I'm submitting it as a sample of my work to a show that takes place in Jackson Hole next September. I won't find out til March 09 if I'm in, so please cross your fingers for me! In the mean time I'll be taking it to an art show next month too along with some other scrim and of course lots of drawings. Micarta is okay. It's not as nice as ivory or corian but it's okay. I do prefer a whiter surface though. I am SO glad I did not do this in color! That's all folks! Got questions? Fire away! ![Smile[2]](/images/smilies/top smiles/smile[2].gif) -Katherine ps- it's now titled "The Lookouts" |
|
#21
|
||||
|
||||
|
Although my tutorial finished up a while ago, I wanted to show you the absolute last step in my handling of this scrimshaw piece, which was to have it framed. It's now mounted in a 7.5 x 10.75 inch frame. Love it! :whoo:
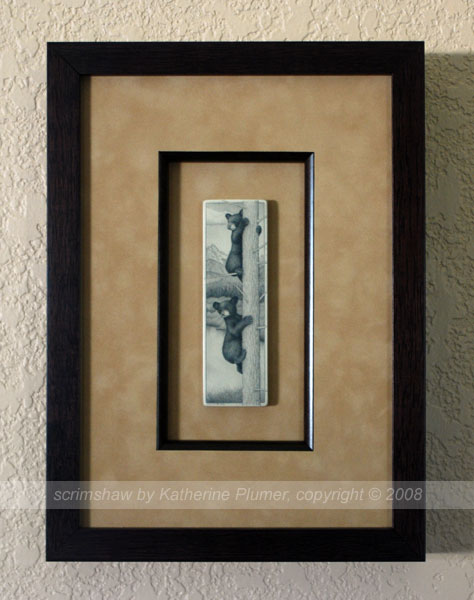 Thanks for reading all my ramblings! ![Smile[2]](/images/smilies/top smiles/smile[2].gif) -Katherine |
 |
| Bookmarks |
|
|