 |
The Internet's Largest and Fastest Growing Engraving Community
Discuss hand engraving using basic to the most advanced methods and equipment
Forum Members: 14,774. Welcome to our newest member, Chuck Norris
EngravingForum.com -
Domain since Feb 7, 2003
 Graver Video Conferencing is empty Join now!
|
|||||||
| ENGRAVING TOOLS - Paypal accepted | Classes | Glossary | Feedback | Tips | Sharpening | Bulino | Videos | Forum Policies |
 |
|
|
Thread Tools |
|
#1
|
|||
|
|||
|
I want to make a "flat" graver with the Lindsay Knife & Flat Combo template.
The large template has 2 sides, & the small template has four sides. I don't know which sides of the templates go with the sides of the graver. Is this shown somewhere or is there a rule of thumb to follow? Same question applies to other templates.
__________________
Bill |
|
#2
|
||||
|
||||
|
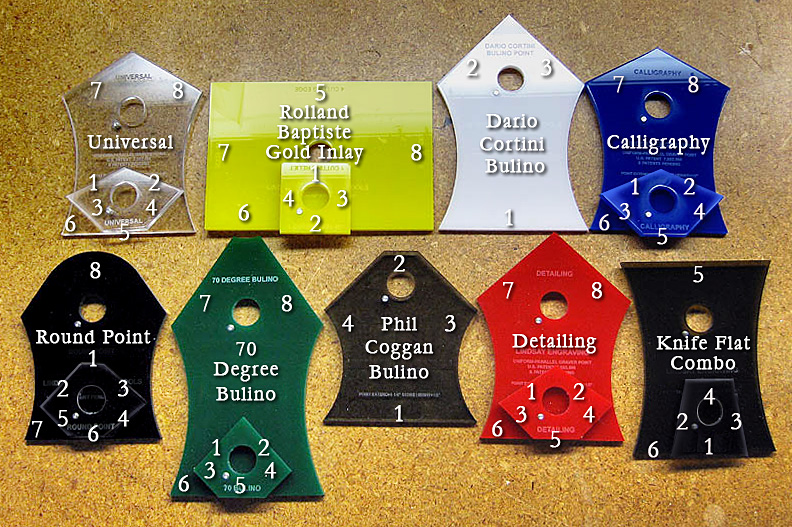
use the little templete first first for build the principal geometry,follow the numbers of this image:
 and after use the large template to make the 45 face of the graver aun de heel,is very simple follow the number in order |
|
#3
|
|||
|
|||
|
This is very helpful. Thanks very much.
I assume that for the Knife & Flat Combo, #1 is the top of the graver & #4 is the bottom, correct? Also, are there any drawings or guidelines on dimensions for the sides?
__________________
Bill |
|
#4
|
||||
|
||||
|
the order of the number is for the face that you have to the "bottom" when you sharp the graver, for the size , no there are'nt a guidelines because you can make the size that you need for the flats until the little one beguin a knife for this reason is a " combo"
|
|
#5
|
|||
|
|||
|
Hi Bildio
This is a link to a demo By Vilts on sharpening a flat ; ![Yo[1]](/images/smilies/top smiles/yo[1].gif) Script lettering on an old-old Zippo: Sharpening with Lindsay sharpener - flat & knife It is on this thread ; http://www.engravingforum.com/showth...ighlight=vilts SE ![Yo[1]](/images/smilies/top smiles/yo[1].gif)
__________________
Learn from those who know more than you do and teach those who know less than you do. - I.M. |
|
#6
|
|||
|
|||
|
The video is very clear & helpful, but I'm still confused by something very basic & seemingly simple.
For the Knife & Flat Combo: When side #1 of the small template is on the plastic board, is the top or bottom of the graver being shaped?
__________________
Bill |
|
#7
|
||||
|
||||
|
the number indicates the side of template that must support down when you sharpen
|
|
#8
|
|||
|
|||
|
but when #1 is down which part of the graver is being shaped? I think it's the top of the finished flat graver.
__________________
Bill |
|
#9
|
||||
|
||||
|
Do what I do (so you don't do what I did and make a graver upside down) - put on the large template and grind your face first. Yes, you'll end up doing it again later but if you put a quick face on the blank then you have an idea which way will be 'up' on the graver.
Also, make a permanent mark on the blank to show which side was 'up' (showing in the notch is how I call it) so you can get the graver back in properly when you need to re-sharpen later. Things like the flat are easy to figure out but for some points... |
|
#10
|
|||
|
|||
|
but when #1 is down which part of the graver is being shaped? I think it's the top of the finished flat graver.
That's right - #1 will shape the top of the graver Roger B2 |
|
#11
|
|||
|
|||
|
Thanks very much. Now I can proceed.
__________________
Bill |
|
#12
|
|||
|
|||
|
Quote:
__________________
Bill |
|
#13
|
|||
|
|||
|
Quote:
Will I use the number 2 side which shown on above photo? What for this number 2 side? |
|
#14
|
|||
|
|||
|
Quote:
Hi Sinan, I have ,only once, used the number 2 side to put a small " flat " at the end of the long grafts ,on the belly of the graver. SE ![Yo[1]](/images/smilies/top smiles/yo[1].gif)
__________________
Learn from those who know more than you do and teach those who know less than you do. - I.M. |
|
#15
|
|||
|
|||
|
Well, I'm posting a reply here because I have a question regarding the "flat" graver. The template (small and large) each has two (2) 1/8 holes with one pin in each piece. Is the extra hole there so you can interchange the 1/8 pin?
Its confusing. Whats the second hole there for? =] A promise I will make is that once I figure all this out, I WILL MAKE VIDEOS EXPLAINING THE PROCESS WITH SPOKEN WORDS, and in English in order to relinquish similar questions. OR, maybe my google and forum search didnt turn out the answer I needed. =] http://vimeo.com/2164592 smokes. |
|
#16
|
||||
|
||||
|
Quote:
__________________
__________________________________ Steve Lindsay AirGraver.com EngravingArtist.com |
|
#17
|
|||
|
|||
|
Awesome, thank you. Makes sense. I just wasnt sure if the pins were removable.
|
|
#18
|
|||
|
|||
|
Steve,
How do you move the pin to the other location? I have tried hammering it out and using pliers and it doesn't budge. Is it glued in? I wanted to try sharpening my QC HSS Flat gravers that I had previous to buying the Lindsay system. Thanks! |
|
#19
|
||||
|
||||
|
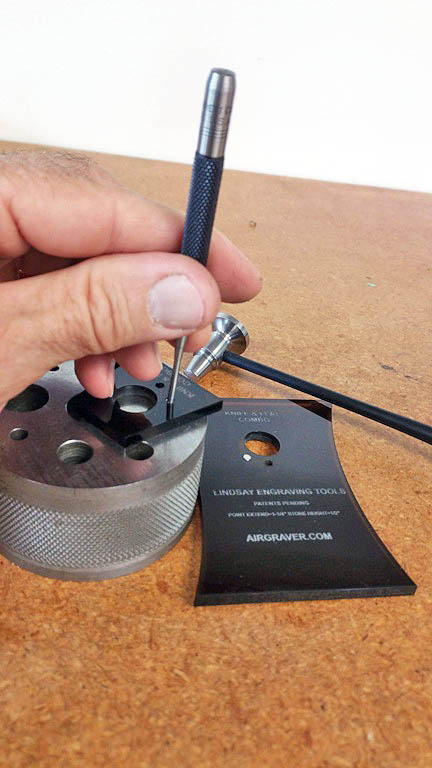
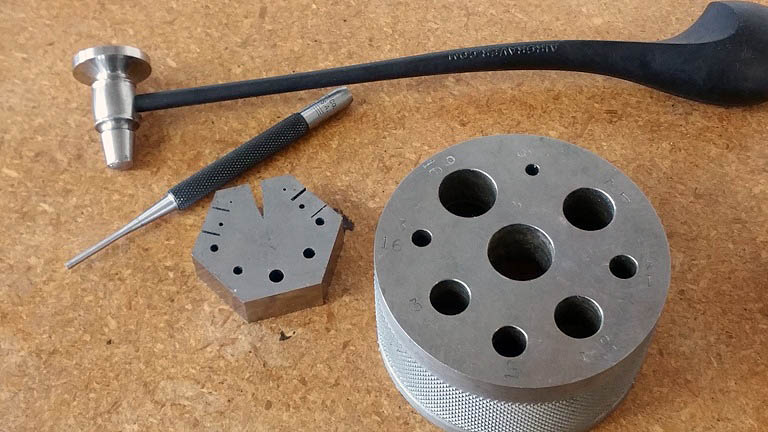
Hi Tonya, Do you mean you'd like to move the pin in the other hole in the flat-knife template? The pin is friction fit in. You can set the template on a bench block or something similar and with a small punch (less that 1/8" diameter) knock the pin out. Align the pin with the other hole than then tap it back in.
 Here is a photo of a smaller bench block 
__________________
__________________________________ Steve Lindsay AirGraver.com EngravingArtist.com |
|
#20
|
|||
|
|||
|
Is this image correct? Unless I'm missing something 5, so the shorter side of the large template, ends up doing the underside/ heel? Wasn't paying attention and think I have now ground myself a massive heel rather than a face :I
|
|
#21
|
|||
|
|||
|
Quote:
Hi Wapping Welcome To The Engraving Forum Side 6 of the large template grinds the face of the graver and side 5 puts a heel . ![Smile[2]](/images/smilies/top smiles/smile[2].gif) Take it off and grind the face first.Or grind the face and the heel will become short to the size you want. SE ![Yo[1]](/images/smilies/top smiles/yo[1].gif)
__________________
Learn from those who know more than you do and teach those who know less than you do. - I.M. |
 |
| Bookmarks |
|
|